
Over the years I’ve developed a real interest in astronomy and am always amazed by how much there is to see in the night sky; even with humble equipment. My home skies are about half way between the orange light pollution of a city and the clear black skies of more remote locations, fortunately it is also only a 30 minute drive to leave the lights of Torbay and head into the less populated areas with much darker skies.
My practical interest in astronomy started with viewing the Moon, Saturn and Jupiter through my friends Russian Tal-1 Newtonian telescope. It’s one thing to learn something like a planet exists; but to witness it with your own eyes brings a very different experience! One thing leads to another and together with my interest in DSLR night sky photography I’ve had to progress to tracking night sky objects with a modern telescope.
Meade ETX 105 Maksutov-Cassegrain Telescope
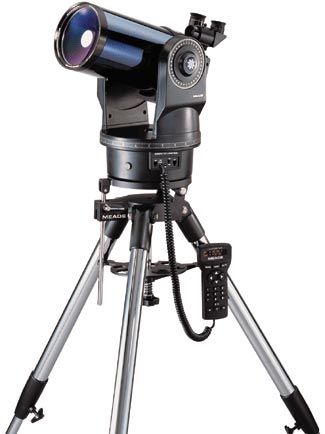
Meade ETX-105
This came up in an advert in the local paper so I did a lot of Googling and ended up buying it! Meade ETX scopes are very common and people have captured some very impressive results with them though various imaging techniques. The telescope has alt-az and polar tracking modes which basically means it can compensate for the rotation of the earth and therefore appear to make the stars stand still. So where normally I would shoot star trails from a static camera; with tracking the stars stay still allowing light to be gathered for long periods of time. This applies to either wide field views of the heavens with a normal camera mounted piggy back on the scope; or through the scope itself for tracking planets or deep sky objects.
The scope came with the Autostar hand controller for all the scope settings and slewing (moving) the scope around. Once aligned properly; this gives the scope ‘goto’ functionality so you can pick an object from the on screen database, press ‘goto’, and the scope automatically moves to that object in the sky. It also came with the Meade LPI ccd imager (Lunar & Planetary Imager, basically a Meade USB webcam) and Autostar Suite software for computer based remote control but I haven’t explored this much yet.
I have the Meade QX4000 20mm as my main eyepiece, this was well worth the money as it has a much larger apparent field of view (70deg) while also magnifying slightly more than my 26mm. Put simply; this has a much wider glass lens to look through which is far more comfortable on the eye, some of the cheaper Meade plossl’s are like looking through a keyhole. I’m not using the 2x Barlow so much now since getting that eye-piece.
My astronomy kit list:
- Meade ETX-105 EC (105mm, f14, 1470mm focal length Maksutov-Cassegrain)
- Meade #884 Deluxe Field Tripod
- Meade #497 Autostar hand controller and software
- Meade LPI (Lunar and Planetary Imager)
- Meade QX 20mm, Meade 26mm/18mm/5mm Plossl eyepieces, 2x Barlow
- Nikon D3200 DSLR with 18-52mm and 70-300mm, Seagul right angle 2x viewfinder, IR remote
- Astro-Engineering camera piggy back mount
- Meade T-Adapter for SLR to rear port
- Baader solar film home-made filters
- 12v Power Supply with 2 outs
- BC&G Anti-dewing system
- Compass, mini spirit level, red filtered torches etc
List of objects I have seen through my scope, in order of discovery: (122 Objects, Last updated: 22/3/2009)
- The Moon, pretty hard to miss! Best seen at around half moon for most definition (shadowing of craters etc).
- Jupiter, always has several moons visible in a flat plane with the planet, can see banding in good conditions.
- M31 (Andromeda Galaxy), very large and easy to find but very little detail, M110 visible beside it. Mag: 3.5
- M2 (Globular Cluster), quite an impressive sight as it is so densely packed. Mag: 6.5
- M13 (The Great Globular Cluster in Hercules), an impressive sight as it is bright and densely packed. Mag: 5.8
- NGC 869 & 884 (The Double Cluster), easy to find and a nice sight, some bright orange coloured stars. Mag: 4
- M45 (The Pleiades), our closest and brightest open cluster containing some visible nebulosity. Mag: 1.6
- Saturn, this winter the great ringed planet returned, the most moons I have seen at once is 3.
- M42 (The Great Nebula in Orion), possibly the most impressive object I’ve seen to date, incredibly bright. Mag: 4
- M44 (Beehive Cluster/Praesepe), spotted with the naked eye first, a loose but bright open cluster with a Mag: 3.7
- M81 (Bode’s Galaxy), wasn’t easy but eventually saw the fuzzy condensed central area. Mag 6.9
- The Sun, I’ve made myself a solar filter so can now observe sun spots and faculae etc, see below for info.
- M82 (Cigar galaxy), both M81&M82 galaxies in fov with 28mm eye-piece, really nice. Mag: 8.4
- M3 (Globular Cluster), quite easy to find but a bit blurry from home, not much definition on this occasion. Mag: 6.2
- M5 (Globular Cluster) – Pretty nice, seen from a friends house with not good seeing conditions. Mag: 5.8
- M104 (Sombrero Galaxy), could see the flattened shape but seen under moonlit sky so not ideal. Mag: 8
- M64 (Black Eye Galaxy), seen under moonlit sky so not ideal. Mag: 8.5
- M53 (Globular Cluster) Seen under moonlit sky so not ideal. Mag: 7.6
- M51 (Whirlpool Galaxy) nice double galaxy, seen under moonlit sky so not ideal. Mag: 8.4
- M12 (Globular Cluster) Seen under moonlit sky so not ideal. Mag: 6.7
- M10 (Globular Cluster) Seen under moonlit sky so not ideal. Mag: 6.6
- M14 (Globular Cluster) Seen under moonlit sky so not ideal. Mag: 7.6
- M92 (Globular Cluster) Seen under moonlit sky so not ideal. Mag: 6.4
- M57 (Ring Nebula) Really nice, obvious ring shape. Seen under moonlit sky so not ideal. Mag: 8.8
- M9 (Globular Cluster) Seen under moonlit sky so not ideal. Mag: 7.7
- M4 (Globular Cluster) Seen under moonlit sky so not ideal. Mag: 5.6
- M63 (Sunflower Galaxy) Seen under moonlit sky so not ideal. Mag: 8.6
- M101 Very very dim but takes up quite a large area, very nearly missed it! Mag: 7.7
- M4 (Globular Cluster) right beside Antares but wide and dim compared to others. Mag: 5.6
- M11 (Open Cluster) – Really nice, bright, irregular shape. Mag: 5.8
- M27 (Dumbbell Nebula) Easily visible, found by accident on a partially cloudy night, very nice. Mag: 7.4
- M6 (Butterfly Cluster) bright open cluster, low in the sky so not too impressive. Mag: 4.2
- M8 (Lagoon / Hourglass Nebula) bright nebula and cluster to the side, nice! Mag: 5.8
- M15 (Globular Cluster) small and dim under the conditions. Mag: 6.4
- M16 (Eagle Nebula) Nice cluster with nebulosity. Mag: 6
- M17 (Omega / Swan / Horseshoe Nebula) Nice, cigar shaped core with cluster. Mag: 6
- M18 (Open cluster) Large very open cluster. Mag: 6.9
- M19 (Globular Cluster) Small and dim core in this occasion. Mag: 7.2
- M20 (Triffid Nebula) Dim but nice, center star, only 1.23° above M8. Mag: 6.3
- M21 (Open Cluster) Mag: 5.9
- M22 (Globular Cluster) Small and dim core again; close to horizon. Mag: 5.09
- M23 (Open Cluster) Nice with many bright stars. Mag: 5.5
- M24 (Milky Way Patch or Little Star Cloud) Nice large bright open. Mag: 4.6
- M26 (Open Cluster) Small open. Mag: 8
- M28 (Globular Cluster) Small compressed core. Mag: 6.9
- M29 (Open Cluster) Large spread with bright stars. Mag: 6.6
- M110 (Satellite Galaxy of M31) Easy to see, not convinced I’ve seen M32 yet. Mag: 8.5
- Mars – Low to the horizon so not ideal; very red, no moons visible. Mag: 0.4
- NGC7789 (Dense Open Cluster in Cass) Found in one of my pics then located easily by hand. Mag: 6.7
- Uranus Small and very star like but not twinkling at all. Light blue. Mag: 5.7
- M103 (Open Cluster) Small but quite dense. Mag: 7.4
- M34 (Open Cluster) Loose with bright stars. Mag: 5.5
- M39 (Open Cluster) Spread out and sparse. Mag: 4.6
- M52 (Open Cluster) Nice, with a dense side and a sparse side. Mag: 7.3
- NGC6826 (Blinking Planetary) Smaller even than the Ring nebula but bright and light blue. Mag: 10
- NGC6819 (Foxhead Cluster) Nice V shape. Dim but dense with nearby stars to help resolve it. Mag: 7.3
- M56 (Globular Cluster) Not very bright but seen in below average seeing conditions. Mag: 8.3
- M71 (Globular Cluster) Again, not very bright and looked very loose for a globular cluster. Mag: 8.2
- M76 (Little Dumbbell Nebula) Nice irregular shape within 3 nearby stars forming a rectangle. Mag: 10.1
- Comet Holmes (17P) First comet I’ve seen, visible with naked eye, large in the scope. Mag: 2.5
- M37 (Open Cluster) Nice bright and dense cluster. Mag: 6.2
- M38 (Open Cluster) Loose and very open. Mag: 7.4
- M34 (Open Cluster) Bright stars but very open and spread out. Mag: 5.5
- M36 (Open Cluster) Few stars but fairly bright. Mag: 6.3
- M35 (Open Cluster) Nice bright open with cascade pointing towards dense NGC2158 within. Mag: 5.3
- M52 (Open Cluster) Small but densely packed. Mag: 7.3
- M78 (Double reflection nebula in Orion) Seen as two stars each in a blur. Mag: 8.3
- M1 (Crab Nebula) Nice oval blurry nebula – remnant of the 1054AD supernova. Mag: 8.4
- NGC1746 (Open Cluster) Spread out and sparse. Mag: 6.*
- NGC752 (Open Cluster) Bright but open. Mag: 5.7
- NGC2281 (Open Cluster) Small loose open. Mag: 5.4
- M100 (Spiral Galaxy) Dim from home. Mag: 9.3
- M85 (Lenticular Galaxy ) Dim from home. Mag: 9.1
- M88 (Spiral Galaxy) Dim from home. Mag: 9.6
- M91 (Spiral Galaxy) Dim from home. Mag: 10.2
- M99 (Spiral Galaxy) Dim from home. Mag: 9.9
- M59 (Elliptical Galaxy) Two galaxies in FoV (M59 & M60). Mag: 9.6
- M60 (Elliptical Galaxy) Two galaxies in FoV (M59 & M60). Mag: 8.8
- M49 (Elliptical Galaxy) Dim from home. Mag: 8.4
- M65 (Spiral Galaxy) in the Leo Triplet. Mag: 9.3
- M66 (Spiral Galaxy) in the Leo Triplet. Mag: 8.9
- M95 (Spiral Galaxy) in Leo, dim from home. Mag: 9.7
- M96 (Spiral Galaxy) in Leo, brighter but dim from home. Mag: 9.2
- M105 (Elliptical Galaxy) in the Leo I or M96 group, two galaxies in FoV (M105 & NGC3384). Mag: 9.3
- NGC3384 (Elliptical Galaxy) in the Leo I or M96 group, two in FoV (M105 & NGC3384). Mag: 8.9
- M97 (Owl Planetary Nebula) dim but very round, couldn’t see the eyes. Mag: 8.9
- M40 (Double Star Winnecke 4) nothing special, one of three unusual objects in Messier’s catalog. Mag: 8.4
- M94 (Spiral Galaxy) in Canes Venatici. Mag: 8.2
- M106 (Spiral Galaxy) in Canes Venatici. Mag: 8.4
- M67 (Open Cluster) A nice sight, quite bright and condensed. Mag: 6.1
- NCG3115/Caldwell 53 (Spindle Galaxy) Nice, small but sharp looking, definitely elongated. Mag: 9.2
- Mercury Seen with the aid of a conjunction with a new Moon, not sharp being so low, pics here. Mag: -0.8
- M41 (Open Cluster) Bright, just below Sirius, good in binoculars. Mag: 4.5
- NGC1907 (Open Cluster) Small but dense, right beside M38. Mag: 7.4
- NGC1647 (Open Cluster) in Taurus, an easy target between the horns of the bull. Mag: 6.4
- M46 (Open Cluster) Dim but dense in amount stars. Right beside M47. Mag: 6
- M47 (Open Cluster) Bright but sparse, beside M46 in Puppis. Mag: 5.2
- M50 (Open Cluster) Large and bright but located in a rich star field. Mag: 5.9
- M48 (Open Cluster) Sparse medium brightness. Mag: 5.5
- M108 (Edge-on Spiral Galaxy) Stands out in line with two stars, bright for: Mag: 10
- NGC2506/C54 (Open Cluster) Dense medium brightness. Mag: 7.6
- NGC2539 (Open Cluster) Fairly dense, next to bright star. Mag: 6.5
- NGC2841 (Spiral Galaxy) Nice oval with a bright core, beside two bright stars. Mag: 9.3
- NGC2903 (Spiral Galaxy) Large diffuse nebula at the head of Leo. Mag: 8.9
- NGC3184 (Face-on Spiral Galaxy) Only just able to detect this from home. Mag: 9.8
- M109 (Face-on Barred Spiral Galaxy) Just detectable between two stars, hard because of glare. Mag: 9.8
- NGC2683 (Edge-on Spiral, The UFO Galaxy) Could see it was edge-on, beside bright star. Mag: 10.6
- NGC4565/C38 (Edge-on Spiral Galaxy) Dim but detectable from home. Mag: 9.6
- M87 (Elliptical Galaxy) Dim fuzzy ball with a second in FoV which turns out to be M84. Mag: 8.6
- M84 (Elliptical Galaxy) Brighter fuzzy ball with another in FoV (see above), part of Virgo cluster. Mag: 9.1
- NGC2264 (Open Cluster) Christmas Tree Cluster (bright star at the foot of tree). Mag: 3.9
- NGC2244 (Open Cluster) within Rosette Nebula. Mag: 4.8
- M93 (Open Cluster) Compact and bright. Mag: 6
- M58 (Spiral Galaxy) within two stars. Mag: 9.7
- M61 (Spiral Galaxy) large and diffuse. Mag: 9.7
- M84 (Spiral Galaxy) brightest of three in a row! M84, then M86, then next line: Mag: 9.1
- NGC4438/NGC4435 (Galaxy Pair; read this) NGC4438 (above) & NGC4435, will try to split soon. Mag: 9.1
- M89 (Elliptical Galaxy) Small and star-like. Mag: 9.8
- M90 (Spiral Galaxy) Interesting! Detail was seen, bright core, very nice. Mag: 9.5
- M98 (Edge-on Galaxy) Faint but averted vision reveals a side-on smudge. Mag: 10.1
Sun Spots – Nikon D3200 / ETX-105 / Photoshop (10/7/2014)
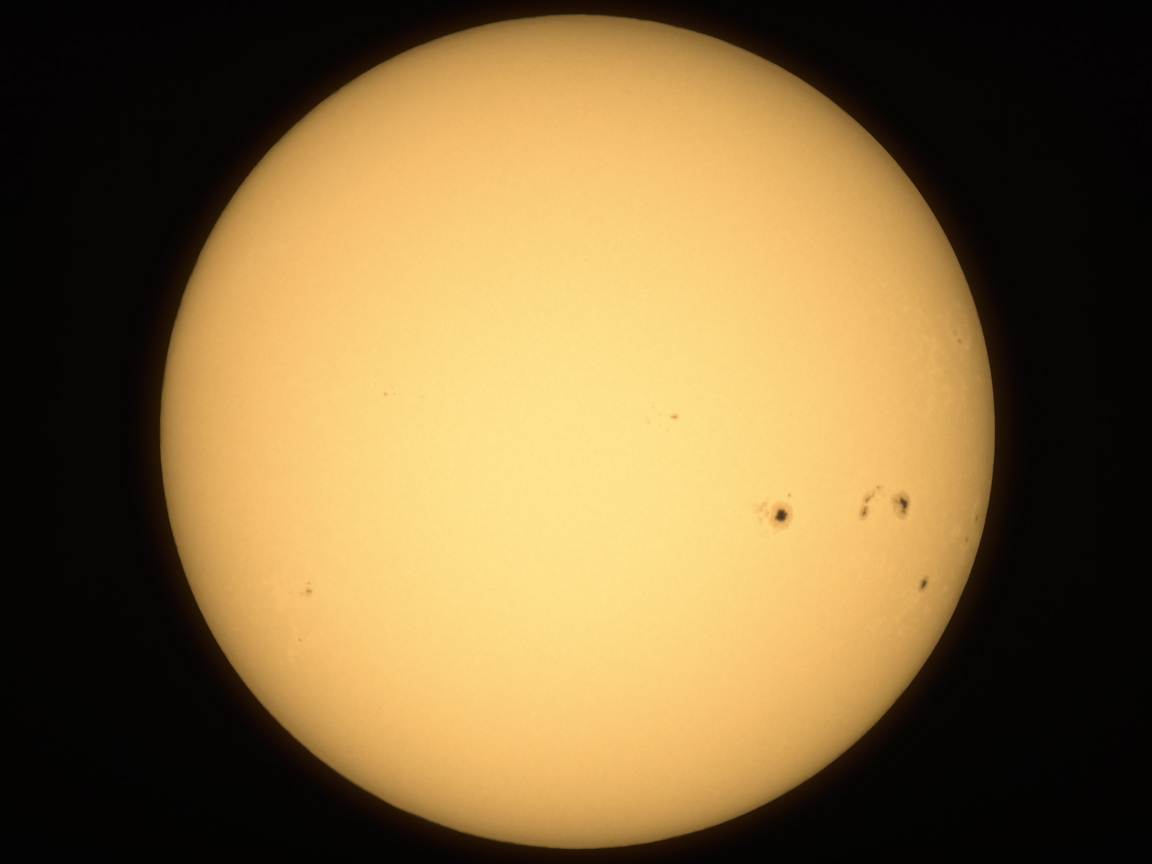 I’d forgotten to check for sunspots lately but by chance today was pretty active so I thought I’d try to better the shot below with the newer camera.
To get a sharpish image I had to shoot at 1/320th of a second; mainly because the Sun is moving pretty quickly but also heat wobble is a factor I think, this meant fairly dark images from the camera with solar filter attached.
I’ve used a chain of brightening, contrast, and colour filters and also some layering to make as realistic a shot as I could; trying to make the Sun appear bright and on-fire as it is!
Sun Spots – Nikon D50 / ETX-105 / Photoshop (28/9/2011)
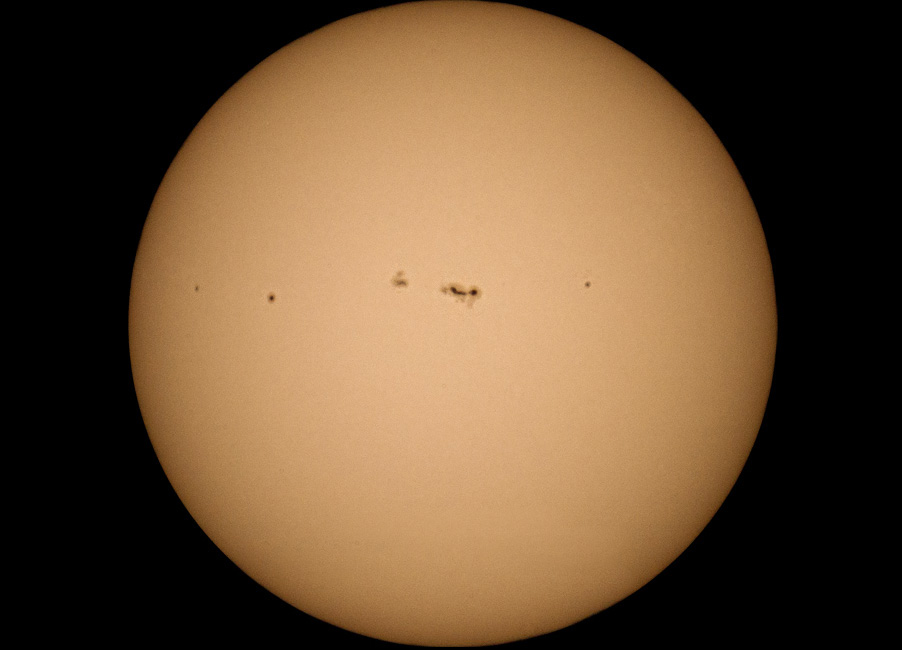 The solar cycles now appears to be advancing as expected and there is currently a nice group visible, it is quite likely that in the coming few years the Sun will get a lot more active still. I used my Nikon D50 mounted prime focus (on the rear port) of the scope, no guiding/electronics, manual positioning with the weight being taken by it resting on the mount, no over tightening of the ALT axis at all which is the week spot on my scope.
This is only a single exposure, no stacking, but it’s a major improvement on the last attempt – firstly the colour, manually controlling the white balance in RAW settings to make a pleasant hue, and also the sharpness which I did by singling out the sunspots for sharpening while leaving the rest of the image alone.
Moon Mosaic – LPI / Envisage / Photoshop (6/4/2009)
With much talk of the Moon at the moment, and with my problems getting the ETX to hold the weight of my SLR, I decided it was time to try the LPI again. The original plan was just to get a decent image of whatever features stood out; however it quickly became apparent that I could cover the whole Moon and attempt a mosaic. I polar aligned the scope and went through the usual alignment procedure, then taped the LPI into position without the barlow so to start simple, then connected the scope to Meade’s Envisage on my laptop. Then the difficult part; I thought – focusing, not so difficult, I managed to get it looking nice live on the screen very quickly, great seeing conditions and a Moon fairly high helped of-course.

I’m using the latest version of Envisage yet had numerous crashes during the night, it seamed to warm into it and was able to auto-guide the scope by drawing boxes around small bright spots on the Moon. I did auto-exposure which took me to 0.0160 where I stayed for the majority of the session, amazingly I didn’t have to re-focus during the 3 hours of imaging either! The preset Moon procedure worked well with edge-enhance set to medium after 10 shots, I like to use a higher quality threshold than default which I set to 90%. Since the images were coming in looking good I ended up making sure I had enough images for a mosaic.
Here came the hardest part; many hours of manual labour, first loading each of the images into Photoshop one at a time, aligning them and selecting the best images to use, no de-rotation was required since the polar-alignment kept them level. Once I had the 35 selected parts of the Moon in place I zoomed in and spent ages with the eraser tool in brush mode gradually fading each image into the next; blending them seamlessly and making sure the accuracy of the data wasn’t compromised by hasty brush strokes. This process took approximately 6 hours of hard manual labour but the anticipation of the developing image kept me going!
So many deep sky objects above us, just knowing where to look (20/3/2009)
My quest to see everything in the Messier catalogue continues, at last we’ve had some fairly clear nights after a really bad start to the International Year of Astronomy. I’ve actually been out three times this week and spent a good few hours out there, very pleasant wrapped up warm with hat’n’gloves etc – my preferred observing position is Alt-Az with the tripod at its lowest height so I can kneel down with a bunch of comfy cushions, this works fine for objects high in the sky; or I pull up a chair for lower objects.
Since this was a serious session I fired up the goto and attached the dew prevention kit, the alignment procedure is easy now and once it’s running objects appear in the eyepiece every time. I took the planisphere I got with the scope out with me and used that for some inspiration of objects to ‘goto’, but didn’t imagine how successful I was going to be – from home only the brightest fuzzy’s are worth looking for really. I went on a journey from M46/M47 in Puppis up to M48 and on through Cancer, Leo, Virgo down through Coma Berenices etc and collected 13 new objects; most being NGC’s and a couple of Caldwell objects, most notably the edge-on UFO galaxy was nice which I never expected to read is a magnitude 10.6! Great fun.
Second go at imaging Jupiter (7/9/2008)
I’ve been out observing Jupiter in between clouds several times this week and was itching to try imaging the planet again. It gets easier each time to setup and align the scope; this time in equatorial mode where last time I had opted for the easier Alt-Az mounting. The alignment worked first time though there was an error of a few degrees in where the scope thought Jupiter was, this didn’t make any difference once I had centered Jupiter.
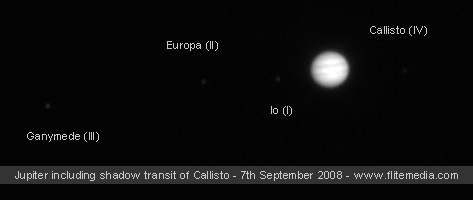
I had the telescope under control from the Envisage software and was able to slew the scope from the laptop, I also managed to get the auto-guiding to work which keeps the planet in the field of view very well, once settled it stayed on screen for the rest of the evening. This involved drawing a box around the planet and then pressing ‘Track Here’ and then using the ‘Center Target’ button to tell the software to do the slewing for me; or at least that’s what appeared to be happening!
All I can do really is trial and error to see what works, after fiddling with the gain and exposure times it turned out that the default settings were best really. At least this time I managed to get a fairly good result using colour, the animation is using all the half-decent results taken throughout the session so includes both mono and colour images. I was aware of the dot bottom left of Jupiter but half thought it may be dust or unwanted artifacts, however upon checking it turns out it was Callisto’s shadow moving across the disc during the session.
Last time I had difficulty getting any images while using the doubling power of the barlow so I thought I would concentrate on trying to better my images at 1x for now, on hindsight it would have been a good idea to at least try, next time…
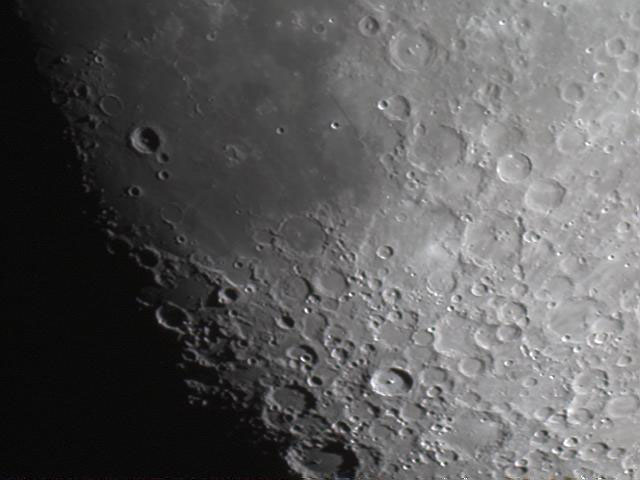
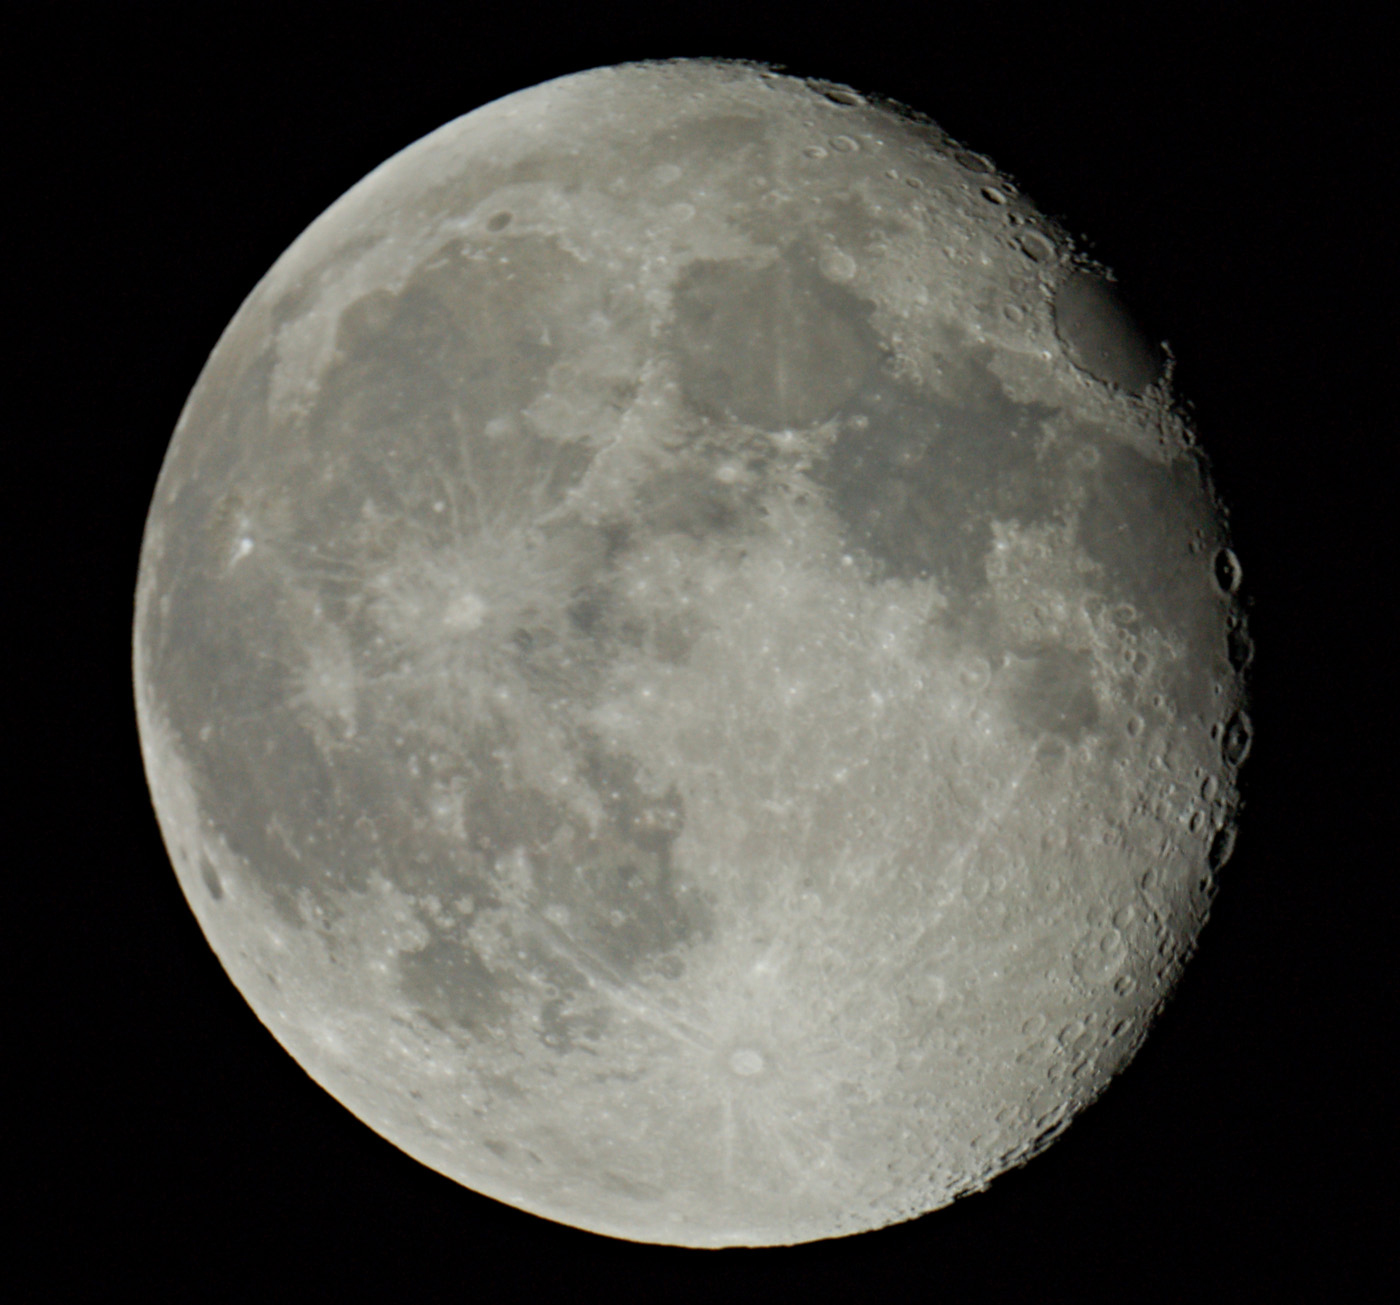
Another go at photographing the Moon – Waxing Gibbous (26/3/2008)
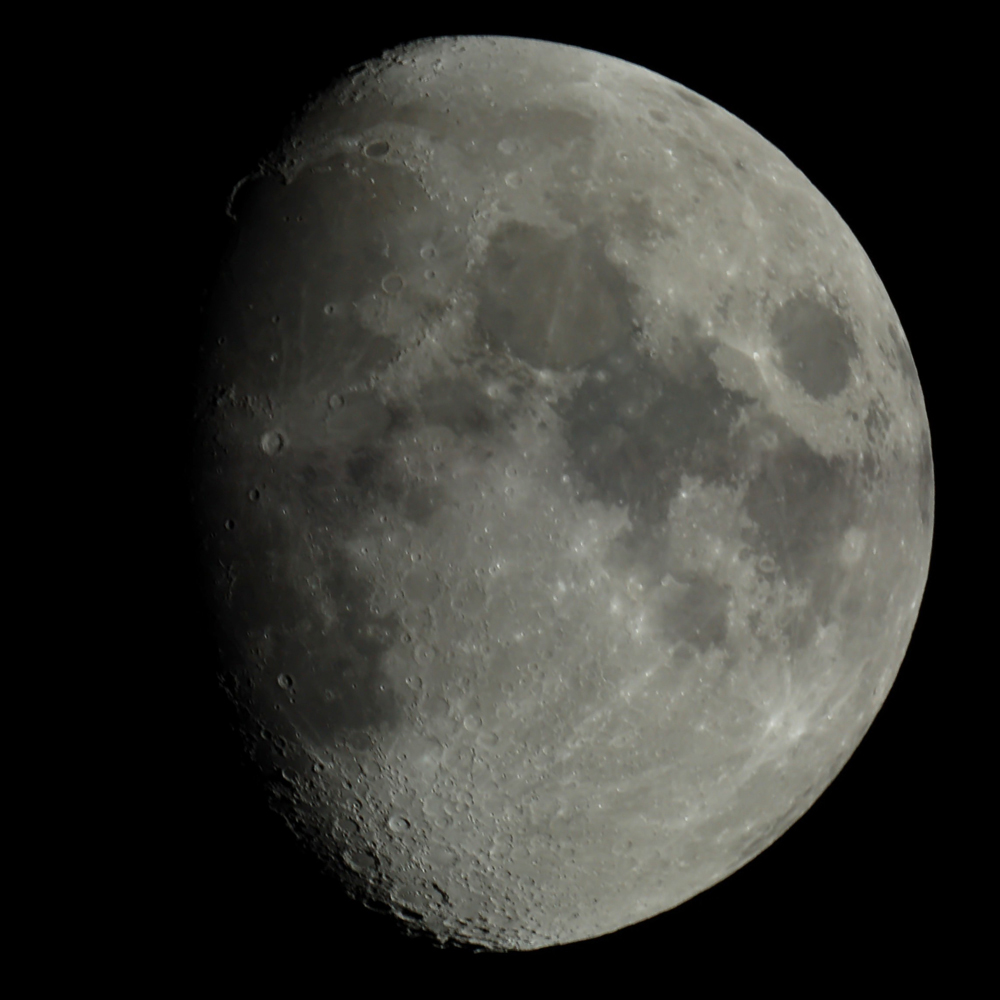 My first go at the gibbous or 75% lit Moon, not that I’m following any game plan, just another opportunity under clear skies. Each new picture at a different stage of the Lunar calendar highlights different features on the surface and I’m starting to get to know the more obvious craters and maria from that. While viewing through my telescope the best sights are always on the terminator – or the point of sunset or sunrise to a Lunar inhabitant. In this case down the left side and bottom left corner are showing the most detail.
I’d say the clearest parts of this image are bottom most sea; the Mare Nubium, and the little spiral of smaller craters within, the largest of which is Bullialdus. From Copernicus (the most obvious crater centre left) upwards seams to loose focus for some reason.
This picture was taken with my Nikon D50 prime focus through my scope, this is becoming a problem due to the weight of the camera so I might think about getting a counter weight system before I cause any damage to the mount. Again I have used NoiseWare noise reduction and sharpening which seams to be the ideal tool for these Lunar images.
Comet Holmes (17P) – A guest in the region of Perseus (29/10/2007)
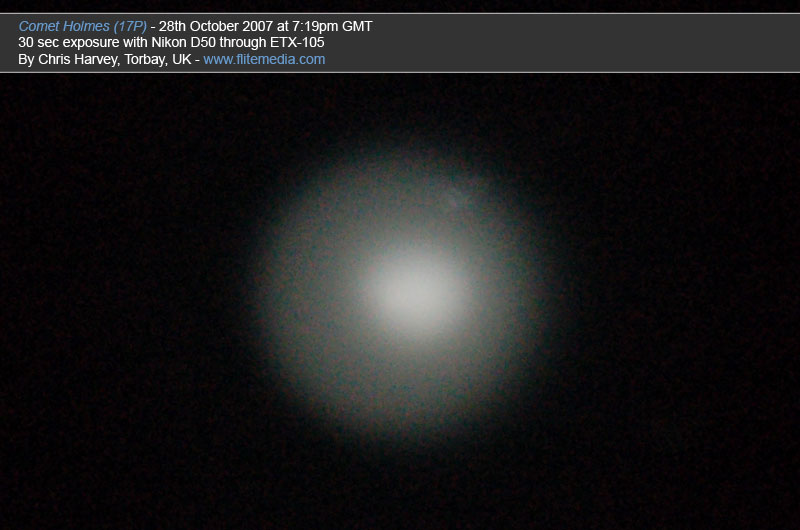 Earlier this week I was alerted to the presence of a new object in the sky, Comet Holmes had unexpectedly brightened from a dim 17th magnitude to a naked eye magnitude of 2.5 or so which is currently visible as a yellowish blurry star-like object in the middle of Perseus. People are still speculating about why this has happened; perhaps the comet is breaking up and revealing more surface area or something; but either way most people seem to think it will be in our night sky for some time and will undergo some change on a daily basis. There is a fan shape in the central area but no cometary tail yet and there’s not likely to be much of a tail at any time as the trail would be facing nearly directly away from us.
 I spotted it with the naked eye first simply by noticing that the central region of Perseus now has a triangle which it wouldn’t normally have. Through binoculars it shows up as a large fuzzy circular object; through the telescope it is big and has a distinct inner region as well as a dimmer round disc, the nucleus is star like and there is also a star-like object to the top right which I think is actually a background star. My image was done hastily with the D50 prime focus through the scope in alt-az mode; the star-like object top right has a bit of trailing due to the tracking not being very accurate but you get the idea of what is visible. I’ll be keeping an eye on this comet as anything could happen really!
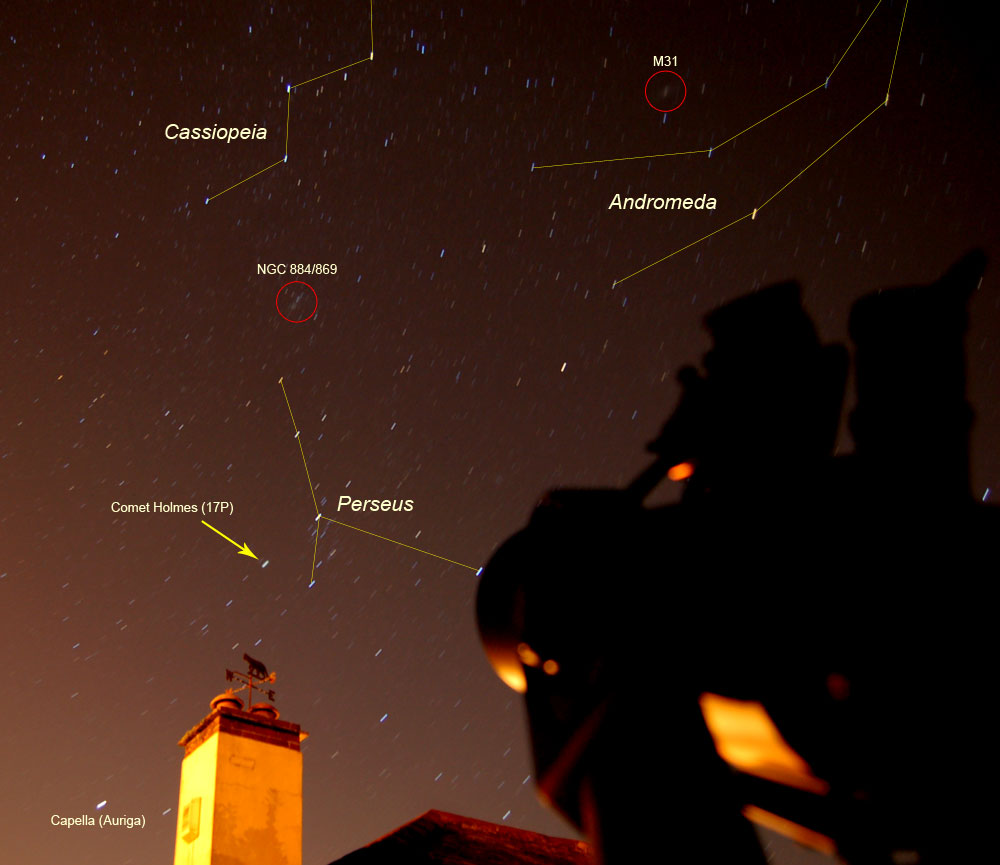
I’ve just added this image on the left as a guide to where the comet is, at the moment the waning Moon is just below the house near the horizon.
Waning Moon – Prime Focus (5/9/2007)
I’ve still got a long way to go with images of the Moon but definitely have improved from my previous attempts here. I’ve also just got my head around the Waxing (before full) and Waning (after full), Crescent and Gibbous (negative or opposite to crescent) and the causes of seasons, eclipses, maria on the Moon etc, the internet is a wonderful source of video lectures and free education! Labeling objects in Photoshop really helps with learning the features.
 Again I had taken lots of images in the hope that stacking in software would yield the best results however so far the best single exposure is the nicest looking image. I seam to be missing something fundamental in Registax! A lot of the reason why this image looks as pleasing as it does is due to NoiseWare noise reduction and sharpening, this simple and free program is great at smoothing the maria (sea’s) of the surface at the same time as sharpening the craters and other features. I think to better this image I’ll have to use the LPI and perhaps mosaic a few pictures together. This picture was taken with my D50 prime focus through the ETX-105, 1/100th of a sec at ISO1600, normally I would be worried that high ISO means crunchy image but it seems fine. No motorized tracking required at shutter speeds that fast, also noting that the seeing conditions were particularly stable that night.
More experiments in polar mode and software stacking (25/8/2007)
 One of my biggest goals right now is to capture images of the Milky Way where you can see plenty of detail in the clouds of stars and dark dusty patches plus many of the nebula and clusters within. I was thinking this should be a fairly easy task! I’ve done star trails in the direction of the summer Milky Way before (see the Night Sky page) which have revealed a fair bit of the overall structure but obviously not much of individual objects, the main potential in those pictures was due to being taken from our dark sky location rather than from home. Anyway, I have much to learn so prepared another night of tests on a lovely Summers night at home under my fairly light polluted sky.
I haven’t managed to get an accurate alignment using polar mode (mounted equatorially) yet and am still struggling however for wide field DSLR piggy back photography small errors don’t cause too much of a problem. I’m also having some problems possibly due to the weight of the camera; occasionally the scope will loose grip on the teeth of the gears and slewing goes nowhere; if I put a little pressure on the scope in the direction i’m supposed to be going then the scope picks up the grip and moves on. My opinion here is that mounting an SLR in prime focus is only applicable for non-motorized control as the ETX just isn’t strong enough to take the weight, piggy back mounting an SLR is less strain but still not ideal due to the additional stress on the motors; this doesn’t stop it being used for wide field SLR work but there are going to be limits.
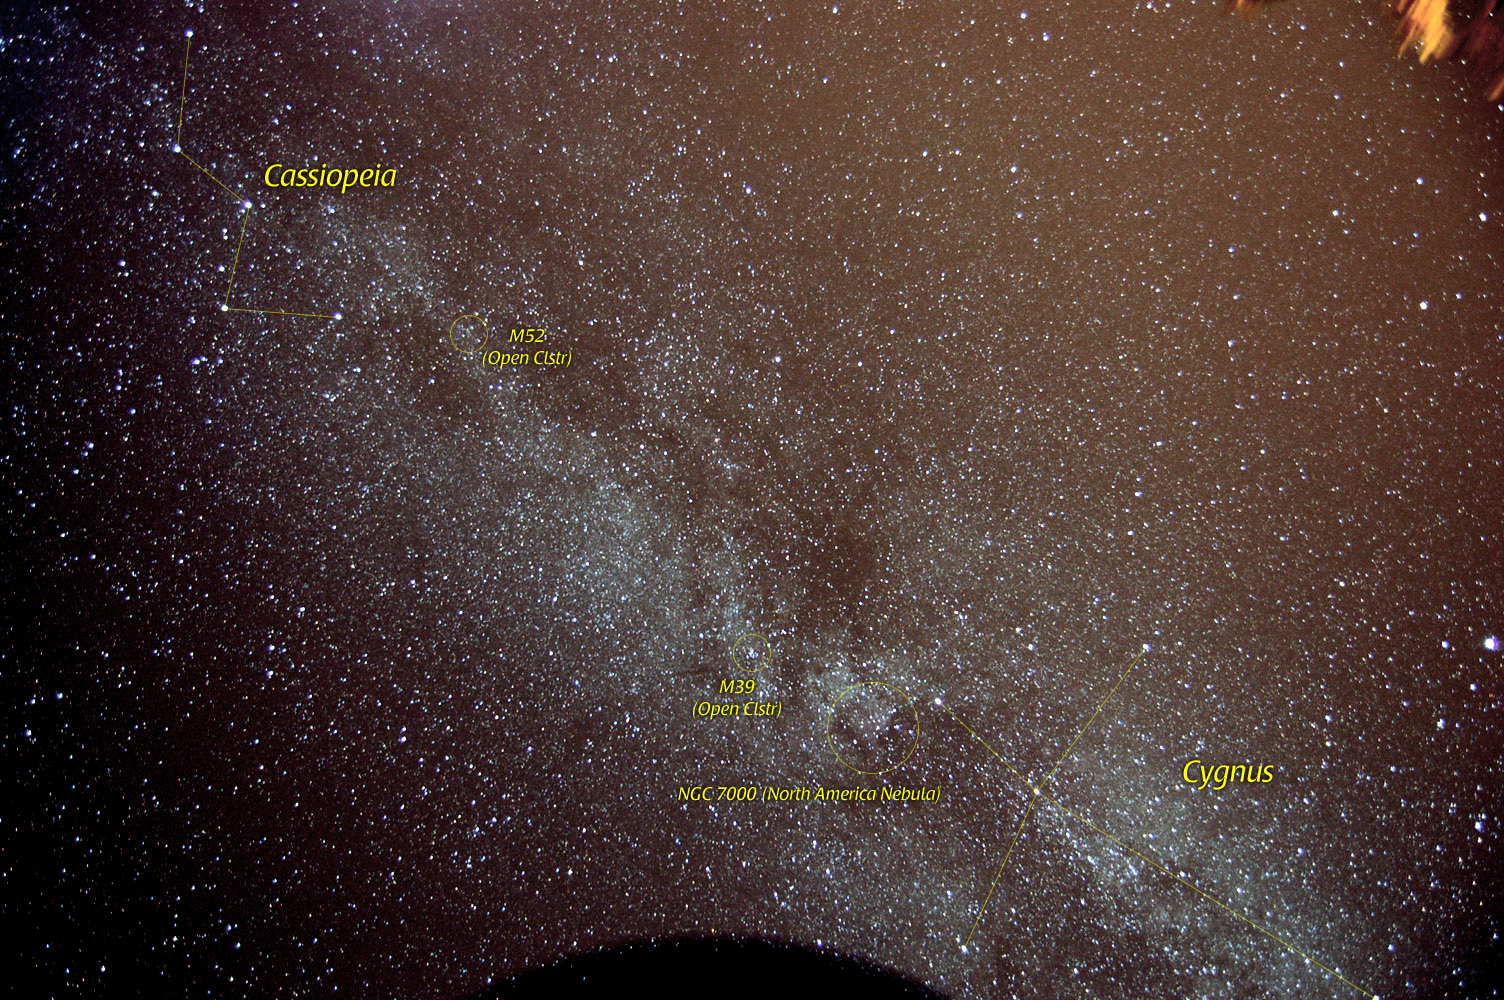
 Light pollution tends to make my images go orange after around 10 minutes of exposure plus I have no dew protection on the SLR yet (coming soon) so you only have a certain time before the stars start showing far less definition and eventually a ruined image. Combined with problems in tracking etc; the way around this, apparently, is to stack images in software. However, my attempts at this on wide-field images so far have given worse results than just taking long exposures. I had taken two series’ of images to be stacked; the Cygnus area was 16 x 30secs so equivalent to an 8 minute exposure, I’d tried various settings in Rot’n’Stack but the more pleasing image was the single 8 minute exposure.
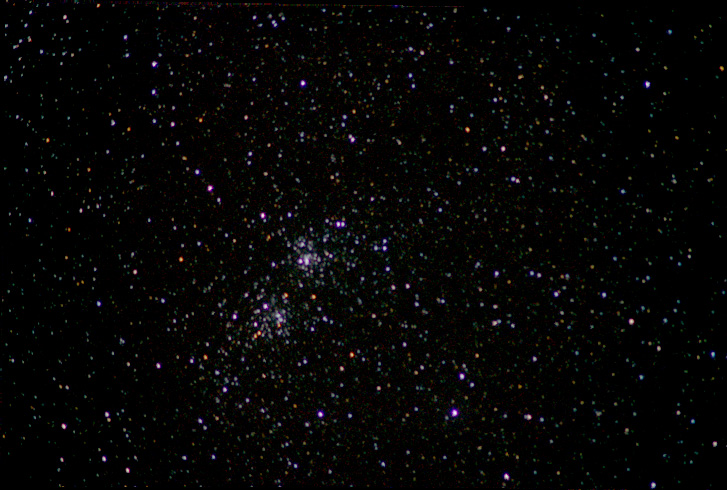 Rot’n’Stack is however the program I’ve had most success from so far (excluding LPI imaging with Envisage); it de-rotates and aligns images very well indeed and I managed to make a good improvement on last Summers attempt at the Double Cluster in Perseus (image to the left). I only had four images taken in Alt-Az mode of around 1 minute each but the software did a really good job of bringing out more stars and clarifying the image. These pictures were done from our dark sky location which makes a huge difference.
The first picture above shows the region of Milky Way between Cassiopeia and Cygnus equatorially tracked for just under 8 minutes. The second picture is the Perseus and Andromeda area exposed for around 5.6 minutes. All taken at the minimum focal ratio of F3.5 through the standard 18-55 lens, the ISO isn’t recorded in the file properties but I’m pretty sure I was shooting at ISO800.
Home made solar filter set for the ETX-105 for £8! (5/4/2007)
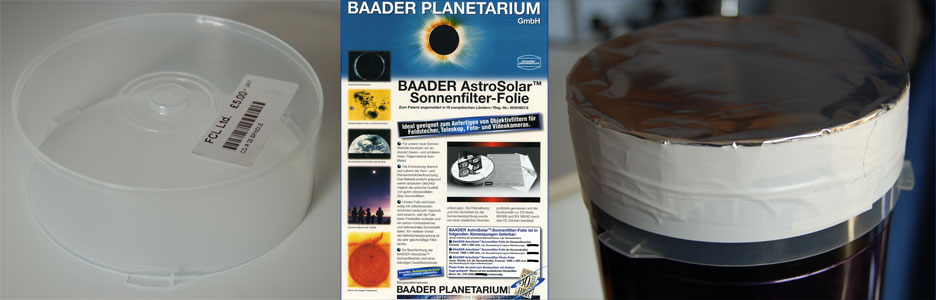
The Sun is the most readily observable object as long as you have the necessary filters to save your precious eyesight. I had seen sun spots through a friends telescope last summer and we actually sat and sketched them, first and only time I’ve ever done sketches. He had the Astro-Engineering solar filter for the ETX-125 which cost him about £90, the filter for my ETX-105 is about £80 and so had to look at cheaper options. I then found the Baader AstroSolar safety film available in A4 sheets for £15 that does the same job!
 First I butchered a plant pot which loosely fit the telescope and that worked; but then it occurred to me to try the container for a CD spindle and to my amazement it fits exactly; not close but exact! Not only that but it has convenient little handles on the side so you can remove the filter without stressing the solar film. Even better; you can get the scope filter and the viewfinder filter out of one half of the A4 sheet so there’s enough left to make one for my mates Tal scope as well!
All I did was cut the top out of the CD spindle with a stanley knife from the inside and then sellotape the solar film into place. To make a more pleasing look I’ve then gone around it with white electrical tape; this also seals the outsides of the transparent plastic so no light can get in. Job done; on the first day in months that there were no sun spots at all! No rush; look out for some CCD images of solar features on here soon.
Second attempt at Saturn imaged with the LPI (10/3/2007)
 After having a decent shot a few days ago and reading more about the LPI, I wanted another go at Saturn. This time I’ve used monochrome (grayscale) which gives the exposure a lot more definition. For some reason in colour the center area of the planet is always overexposed; reducing the exposure time doesn’t seem to cure this. I spent a lot of time trying to get the focus right which is very hard to do; sometime soon I’ll get the electronic focuser to get hands-free and more precise.
I also raised the minimum quality of shots to 90% before they are used in the composite, as long as the first ‘evaluation’ images are decent quality then this ensures only decent shots are stacked on top. Unfortunately the software doesn’t record the info about the image in the meta-data so I don’t actually know how many images are stacked here; I suspect something like 100 as that was one threshold I was using. Photoshop levels and contrast were used to add the finishing touches.
There is now some banding to the planet sphere itself and two distinct sections to the ring system, the next target has to be the Cassini Division which is the separating gap between these two halves. I’m using the 2xBarlow again to get as close as I can; would be interesting to see how a 3xBarlow looks. Very happy with the results for now.
Tracked wide field shot of the Orion region (9/3/2007)
 Last night we went up to Colleton (our darkest location) but the conditions were clearish with patches of hazy cloud so not ideal seeing. My plan was to get a proper tracked shot of Orion before it disappears for the summer, hopefully showing the large amount of colour and nebulosity within the Orion region. The hardest part for my wide angle shots is focusing; the little viewfinder on the camera isn’t enough to see stars properly plus my 18-55mm lens goes over-infinity so it is not as simple as putting the focus full right; you must bring it back a millimeter or two.
This is a two minute exposure of the whole area, covering Sirius; the brightest star in the night sky to the left, then the well known shape of Orion the hunter in the center and the Hades triangle to the right which is part of Taurus. The focus wasn’t right so not worth showing in higher resolution. I used one application of auto-levels in Photoshop which really enhanced the amount of stars visible. I might have another crack at it in coming days.
Winter Skies – First try of M42 the Orion Nebula (29/11/2006)
I’ve been dying to see Orion through the scope since I got it and it was no let down! The main Orion Nebula is probably the most impressive sight I have seen through my scope so far, it’s large and it’s magnitude 4 so very bright indeed for a nebula, so bright it seems easy to overexpose it when doing photography.
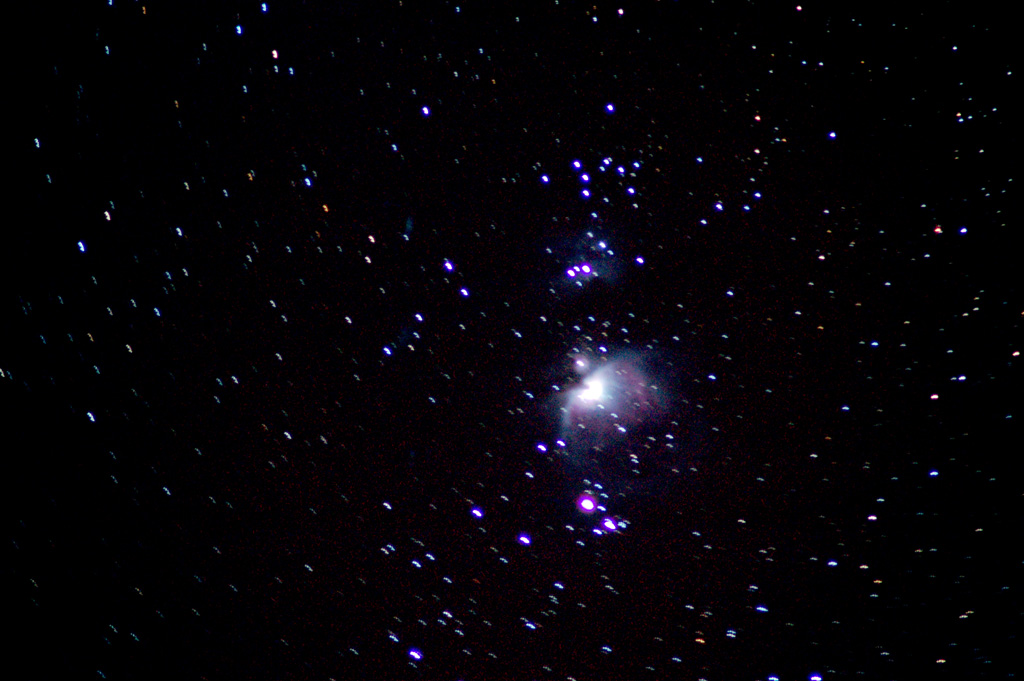 This was a bit of a rushed job and I hadn’t aligned the scope as well as I could have but still managed to get a nice colourful shot of the great nebula. It was shot with my Nikon DSLR with 300mm lens piggy backed on the scope, a single exposure of 165secs at F5.6. The picture was very orange with light pollution before it was edited but I am now getting quite good with Photoshop’s levels tool and can bring out the best in these shots, another time I will try stacking several shots.
I also think I’m letting myself down by using Alt-Az tracking instead of using polar alignment too, I’ve never done that yet but will try soon. If you look at the larger version of the picture you will notice the top right stars have almost no trailing but the stars bottom left have a lot; my guess is that’s because Alt-Az mode doesn’t compensate for celestial rotation, hopefully Polar mode will fix that.
First attempt at stacked images – M45, M2 & M31 (25/9/2006)
Twas a lovely September night and I set myself up with a comfy chair and some beers in the garden etc. Patience and something else to do while the camera is exposing is vital here I think, that is unless you have the luxury of being able to control the scope remotely from indoors with CCD imaging etc. As I haven’t managed to get any success with the LPI yet I am doing all my pictures with my Nikon D50 DSLR & 300mm lens (F5.6) piggy back mounted on top of the scope. Note that the telescope itself has a much larger focal length of 1470mm but a lower aperture of F14 so bigger zoom but less sensitivity, hopefully in the future I will be able to make use of this.
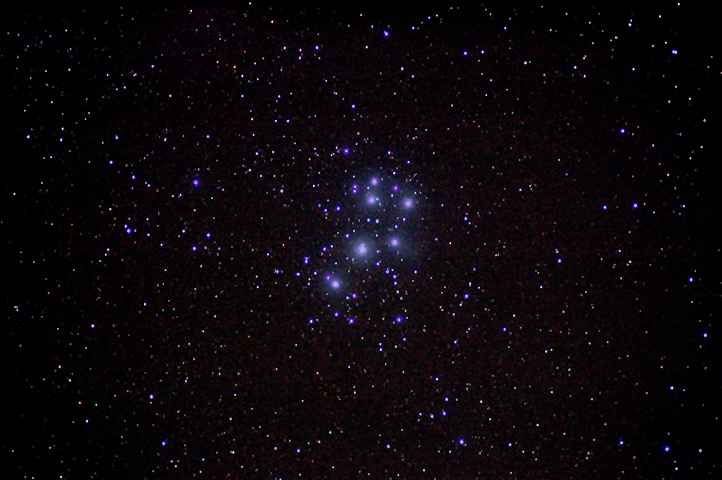

Each of these shots was 10 x 30 second exposures stacked using exclude transparency in Photoshop (as I couldn’t seem to get Registax to work). Certainly with the shot of M31 you can see loads more detail come out as you stack the pictures, the original shots don’t really show anything except the central brightest area. You can also see Andromeda’s two companion galaxies in this shot.
Another Moon session with my Nikon prime focus on the scope (9/9/2006)
 Just a few days after the moon shot below I was out again doing the same thing. As I say below; the t-mount does seem to loose some light but this picture has a lot better colour and definition though perhaps less contrast than the picture below.
Again this is two consecutive pictures stitched together as the Moon is too big for the FOV (field of view) of the 1470mm telescope. The terminator on the top right edge looks nice and clear with plenty detail but the left side of the Moon has very little depth and shows almost no shadowing, I know this is due to the fall of the Sun’s light but maybe I can do better with stacking or something. The pictures were 100th of a second shots.
First light! Like a kid on Christmas morning (5th August 2006)
After picking up my new telescope we headed to Runnage Farm on Dartmoor for a small weekend music festival. The weather was not ideal for the night sky at all on the first day though we did catch a glimpse of the Moon through the clouds which wet the appetite for more.
The Saturday evening provided a little more black sky and a brief opportunity to view Jupiter, the most obvious observation was 4 of it’s moons immediately visible in an approximately flat plane with the planet. Cloud cover soon ruined that.
During the night the clouds parted and the stars came out, it wasn’t quite as black as we hoped partly due to light pollution coming from the campsite itself but the opportunity had to be taken. With no experience of the autostar computer guidance I figured it wasn’t a good time to learn and so just set the scope up without anything to complicate things. From my DSLR photography of the night sky I know how to find M31 (The mighty Andromeda galaxy) with the naked eye so I just pointed the scope in the general direction of the galaxy and scanned about with the viewfinder. After only a minute I had found the large blur in the sky that is our closest neighbor galaxy. Andromeda is actually one of our local group of companion galaxies of which there are about 14, therefore it is the largest in the night sky; the whole detailed spiral system spans around the width of a full moon!
I found that the sight through the telescope was best using the 2x Barlow eyepiece and was clearly the same spiral galaxy as I have seen in so many photos but without the detail of the spiral arms etc. It did look like just a fuzzy patch in the sky and was taking up more wide angle than the eyepiece could show. Still, a great moment and satisfaction knowing my journey beyond this solar system was now officially underway! We retired to our tents very happy.
5 Comments
Excellent website – on my favourites.
Thank you 😀
I connect my philips CCD direct to my skywatcher 5inch Maksutov and stacking software. Hard to use and the auto tracking is not smooth but reasonable results with lunar shots.
I have “discovered” a Meade LPI in my box of tricks. Does anyone know if the drivers are still available (I couldn’t find any), does anyone have the user guide and will the system work with Windows 7? Any help much appreciated.
Hi yea, Win7 no problem, I can’t quite remember atm but you might want to try Meade’s Autostar Suite https://www.meade.com/autostar-suite/ I ‘think’ all the drivers and imaging software are in there .. Been a while so I’m a bit rusty .. ..